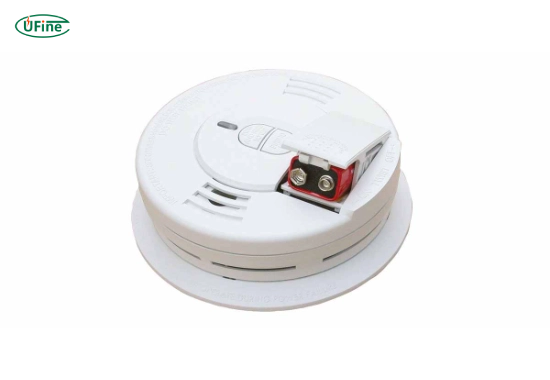
Knowing how to change the battery in a smoke detector is essential for every homeowner. This simple task can make a significant difference in ensuring your safety and the safety of your loved ones. A functioning smoke detector can alert you to smoke or fire, giving you precious time to react. This guide will explore the steps in changing your smoke detector battery, why it’s essential, and best practices to keep your home safe.
Part 1. Why is it important to change your smoke detector battery?
Changing the battery in your smoke detector is not just a routine chore; it is a vital safety measure. Here are some key reasons why this task should be a priority:
- Safety First: Smoke detectors are designed to save lives. They alert you to smoke or fire, allowing you to escape in time. If the battery is dead, the detector won’t work, putting you at risk.
- Legal Requirements: Many areas have laws requiring homes to have working smoke detectors. Regularly changing the batteries helps ensure compliance with these regulations and avoids potential fines.
- Peace of Mind: Knowing that your smoke detector is operational provides peace of mind. You can rest easier, especially when sleeping or away from home.
Smoke Detector Batteries Comprehensive Guide
Part 2. When should you change the battery in your smoke detector?
The National Fire Protection Association (NFPA) recommends changing the batteries in smoke detectors at least once a year. However, many people find it easier to remember this task by aligning it with Daylight Saving Time changes—once in spring and once in fall.
In addition to this annual schedule, pay attention to these signs that indicate it’s time for a battery change:
- Chirping Sounds: If your smoke detector starts chirping or beeping intermittently, it usually means the battery is low and needs replacing.
- Age of the Battery: Even if the detector isn’t chirping, it’s wise to replace the battery if it has been over a year since you last changed it.
Part 3. Types of smoke detectors and their batteries
Understanding your smoke detector type is crucial for correctly changing its battery. Here are the most common types:
- Ionization Smoke Detectors: These detectors are sensitive to fast-flaming fires and typically use a 9V battery. They work by detecting changes in electrical currents caused by smoke particles.
- Photoelectric Smoke Detectors: These are better at detecting smoldering fires and generally use AA batteries. They operate using a light beam that gets disrupted when smoke enters the chamber.
- Combination Detectors: These devices combine ionization and photoelectric sensors and may require AA or 9V batteries. They offer comprehensive protection against various types of fires.
- Hardwired Detectors: These detectors connect directly to your home’s electrical system but usually have a backup battery for power outages. Knowing how to change the backup battery is essential for maintaining their functionality.
Part 4. Tools you’ll need for changing smoke detector batteries
Before you start changing the battery, gather these tools:
- A new battery (check your smoke detector’s specifications for the correct type)
- A screwdriver (if needed to remove the cover)
- A step stool (if your smoke detector is mounted high)
Having these tools ready will make the process smoother and quicker.
Part 5. Step-by-step guide on how to change battery in smoke detector
Changing the battery can vary slightly depending on your smoke detector type. Here’s a detailed step-by-step guide:
For Battery-Operated Smoke Detectors:
- Remove the Detector from Its Mounting Bracket:
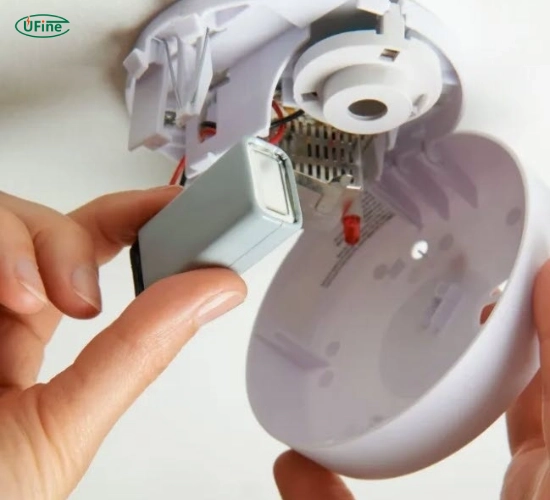
- Twist or pull down on the unit as per manufacturer instructions. Be gentle to avoid damaging any components.
Open the Battery Compartment:
- Locate and open the battery compartment door carefully. Some models may require sliding or pressing a latch.
Remove the Old Battery:
- Please take out the old battery carefully, noting how it was installed (positive and negative orientation). This will help you install the new one correctly.
Insert the New Battery:
- Place the new battery into the compartment, ensuring correct alignment with positive (+) and negative (-) terminals.
Close the Battery Compartment:
- Snap or close the compartment door securely until it clicks into place.
Test Your Detector:
- Press the test button on your smoke detector to ensure it works properly. A loud beep indicates that it is functioning well.
Reinstall Your Detector:
- Place it back onto its mounting bracket securely by twisting or pushing it back into place as needed.
For Hardwired Smoke Detectors with Battery Backup:
Turn Off the Power at the Circuit Breaker:
- This prevents any electrical shock while working on your detector. It’s always better to be safe than sorry!
Remove Detector from Mounting Bracket:
- Follow similar steps as above for battery-operated models.
Disconnect Wiring Harness:
- Squeeze the prongs on the quick-connect wire harness carefully to disconnect it from the back of the unit.
Change Backup Battery:
- Open the battery compartment and replace it as described above, ensuring proper orientation.
Reconnect Wiring Harness:
- Ensure it clicks back into place securely so your detector can function correctly.
Reinstall Detector:
- Twist back onto its mounting bracket and restore power at the circuit breaker by flipping it back on.
Test Your Detector:
- Always test after replacing batteries or reconnecting power to confirm everything works as intended.
Part 6. Common mistakes when changing batteries
To ensure that you perform this task correctly, avoid these common mistakes:
- Not testing after installation: Always test your smoke detector after changing batteries to ensure it’s working correctly.
- Using incorrect batteries: Make sure you use batteries that meet your smoke detector’s specifications; incorrect types can cause malfunctions or damage.
- Ignoring chirping sounds: If your smoke detector chirps even after changing batteries, check for dust buildup or consider replacing it if it’s older than ten years.
Part 7. How often should you replace your smoke detector?
In addition to changing batteries regularly, replacing your entire smoke detector every 10 years or according to manufacturer recommendations is essential. Older detectors may not function effectively even with new batteries due to aging components that can wear out over time.
Part 8. Additional tips for maintaining your smoke detector
To keep your smoke detectors functioning optimally:
- Clean them regularly by vacuuming around them gently to remove dust and debris that could interfere with their operation.
- Ensure they are installed in appropriate locations—avoid placing them near kitchens where cooking fumes might cause false alarms.
- Consider installing interconnected alarms so that if one goes off, they all do—this will significantly increase safety throughout your home.
Part 9. FAQs
-
What type of battery should I use for my smoke detector?
Most smoke detectors use AA or 9V batteries, but some newer models may use sealed lithium batteries that last up to ten years without replacement. -
How do I know if my smoke detector needs a new battery?
If your smoke detector emits a chirping sound or if you notice that it doesn’t respond when tested, it’s time to replace the battery immediately. -
Can I use rechargeable batteries in my smoke detector?
While some people opt for rechargeable batteries, it’s best to stick with alkaline or lithium non-rechargeable batteries recommended by manufacturers for optimal performance and reliability. -
What should I do if my smoke alarm goes off after replacing the battery?
If your alarm continues to sound after you replace its battery, check for dust buildup inside, or consider replacing the unit if it’s older than ten years since older models may not function properly anymore. -
Is it necessary to test my smoke alarm after changing its battery?
Yes! Testing ensures that the new battery and alarm system are functioning correctly and ready for action in case an emergency arises in your home.
Related Tags:
More Articles

How to Choose the Best Floor Scrubber Battery for Commercial Cleaning?
Selecting the ideal floor scrubber battery ensures a long runtime, rapid charging, and minimal maintenance for efficient commercial cleaning operations.
Battery for Blower vs Battery for Leaf Vacuum: Which One Should You Choose?
Battery for blower vs leaf vacuum—learn the key differences in power, fit, and runtime to choose the right battery for your outdoor tool needs.
How to Choose the Right Battery for Blower?
Choosing the right blower battery? Consider voltage, capacity, chemistry & usage. This guide helps match the best battery for peak performance.
How to Choose the Best Insulated Battery Box for Lithium Batteries?
Choosing the Best Insulated Battery Box for Lithium Batteries? Discover key factors such as size, material, and safety for optimal protection and performance.
7 Critical Elements on a Lithium Battery Shipping Label
What must be on a lithium battery shipping label? Learn 7 key elements to ensure safety, legal compliance, and correct handling across all transport modes.


