This article will explore how to clean leads from a leaking battery safely. Battery leaks can be dangerous; cleaning them requires careful planning and the right tools. Batteries hold chemicals that can harm your skin, eyes, and even your respiratory system. Whether you are a beginner or have some experience, this step-by-step guide will help you understand the process in a friendly, conversational style. We will cover what a leaking battery is, why cleaning its leads is essential, and how to perform each step safely. Remember, working with a leaking battery is not something to take lightly. Always follow safety instructions and use the proper gear. Let’s dive into the details and learn how to effectively clean leads from leaking batteries.
Part 1. What is a leaking battery?
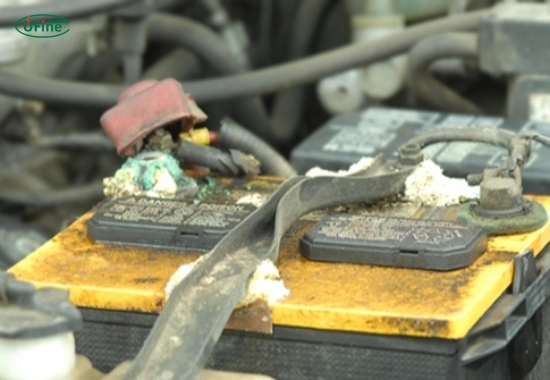
A leaking battery has allowed its liquid or chemical contents to escape. Batteries contain a mix of chemicals—often acids or alkaline solutions—that are sealed within a sturdy casing. Over time or due to damage, this casing may crack or wear out, leading to a leak. When a battery starts to leak, you might notice discolouration, corrosion, or even a strange odour from the battery compartment.
Leaks can happen for several reasons:
- Aging: Over time, the battery’s internal components can degrade.
- Damage: Physical impacts or mishandling may cause the battery casing to crack.
- Overcharging: Improper charging techniques can stress the battery, leading to leaks.
When a battery leaks, the chemicals can escape and damage the metal leads. This damage can reduce performance or create a fire or explosion hazard if the chemicals react with other materials. A leaking battery is a warning sign that the battery is no longer functioning correctly and needs special care. Regularly inspecting your batteries and watching for signs of leakage is an essential maintenance task. Understanding what a leaking battery is lays the foundation for safely cleaning the affected leads and preventing further damage.
Artikel Terkait: Why Do Batteries Leak? Understanding the Causes and How to Prevent It
Part 2. Why clean leads from leaking batteries?
Cleaning the battery leads is crucial for several reasons. When a battery leaks, the chemicals can corrode the metal contacts and connections. This corrosion can interrupt the flow of electricity, causing devices to work improperly or even fail. By choosing to clean leads from leaking batteries early on, you can prevent further damage and ensure your device continues to operate smoothly.
Here are a few reasons why cleaning is essential:
- Prevent corrosion: Chemicals from the leak can eat away at the metal, leading to poor contact.
- Ensure safety: Corroded leads can cause short circuits or sparks, leading to fires.
- Extend battery life: Removing harmful residues keeps the battery functioning better for longer.
- Maintain performance: Clean leads provide a stable and efficient electrical connection, helping your device run optimally.
Regular maintenance is key. It is time to act if you see any signs of leakage or buildup on the leads. This guide will show you how to clean leads from leaking batteries in a few careful steps. Following these steps improves your battery’s performance and minimizes risks associated with chemical exposure.
Part 3. What are the safety risks?
Cleaning battery leaks involves risks that must be managed with care. Batteries contain corrosive chemicals that can cause burns and other injuries. Here are some of the safety risks to be aware of:
- Chemical burns: The leaked acid or chemicals can burn your skin on contact.
- Eye injuries: Splashes can easily harm your eyes if you are not wearing proper protection.
- Respiratory issues: Fumes from the chemicals might irritate your lungs and cause breathing problems.
- Electrical hazards: Improper handling may lead to short circuits, which can cause sparks or even fires.
It is essential to use proper safety gear and follow instructions carefully. Work in a well-ventilated area and always have a first aid kit nearby. These risks highlight why taking your time and following every step of the cleaning process is so important. Never rush when dealing with a leaking battery; if you feel unsure, consider seeking professional help. Safety should always be your top priority when you clean leads from leaking batteries.
Part 4. What safety gear should you use?
Before you begin any cleaning process, gather all the necessary safety gear. This is the most essential part of preparing to clean leads from leaking batteries. The right equipment will protect you from harmful chemicals and prevent injuries. Here’s a list of what you should have:
- Gloves: Use thick, chemical-resistant gloves to protect your hands.
- Goggles: Wear safety goggles to shield your eyes from splashes.
- Face mask or respirator: These help prevent inhaling dangerous fumes.
- Protective clothing: An apron and long sleeves can guard your skin from accidental splashes.
- Closed-toe shoes: Ensure your feet are protected from spills.
Make sure all your gear is in good condition before starting. If any item appears worn or damaged, replace it immediately. Having complete protection not only keeps you safe but also allows you to work confidently. Preparing your safety gear first sets a solid foundation for the rest of the cleaning process. Remember, your health is more important than any battery repair, so never compromise on safety.
Part 5. How do you prepare for cleaning?
Preparation is critical when you plan to clean leads from leaking batteries. A well-organized work area minimizes risks and makes the process smoother. Follow these steps to prepare:
- Choose a safe location: Work outdoors or in a well-ventilated space. Ensure the area is clear of children, pets, or any flammable materials.
- Disconnect power sources: If the battery is connected to a device, turn off and unplug the equipment to avoid electrical hazards.
- Gather supplies: Collect all the tools and safety gear you need, such as gloves, goggles, cleaning agents, and absorbent cloths.
- Set up a cleanup station: Arrange your supplies on a clean surface. Use old newspapers or a disposable cloth to catch any spills.
- Review battery instructions: If available, consult the battery’s manual for specific cleaning recommendations.
By taking these steps, you create a controlled environment that makes cleaning leads from leaking batteries safer. Preparation also helps you avoid missing any critical steps during the cleaning process. This proactive approach protects you and ensures the battery is handled carefully. You can confidently move on to the next stage when everything is set up and ready.
Part 6. What tools and supplies do you need?
You must have the proper tools and supplies to effectively clean leads from leaking batteries. Using the right equipment makes the job easier and reduces risks. Here is a detailed checklist of what you should gather:
- Protective gear: Gloves, goggles, face mask/respirator, protective clothing, and closed-toe shoes.
- Neutralizing solution: An ideal neutralizing solution mixes baking soda and water. Typically, one tablespoon of baking soda per cup of water neutralizes battery acid.
- Soft brush: A brush with soft bristles will help you scrub the battery leads without causing further damage.
- Absorbent cloths: Use these to wipe off the cleaning solution and any remaining chemical residue.
- Container: A small container to mix your cleaning solution.
- Insulated tools: Non-metallic or insulated tools are safer for disconnecting and cleaning battery parts.
- Optional cleaning agent: A specialized battery terminal cleaner can help remove stubborn corrosion, but always test it on a small area first.
- Fire extinguisher: Keep one nearby in case of an emergency.
Each tool plays an important role. For example, the neutralizing solution helps to counteract the harmful chemicals, while the absorbent cloths remove debris and moisture. Ensure all supplies are clean and in good condition before starting the work. Having everything prepared lets you clean leads from leaking batteries systematically and safely.
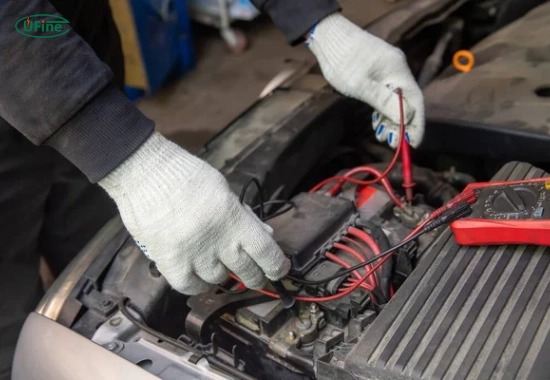
Part 7. How to safely disconnect the battery?
Disconnecting the battery is a crucial step before you start cleaning its leads. Doing this correctly reduces the risk of electrical shocks and other hazards. Follow these steps to disconnect the battery safely:
- Turn off the device: Ensure that the equipment connected to the battery is entirely powered down.
- Remove the negative cable first: Carefully detach the negative (usually marked with a “–” sign) cable using insulated tools. Removing the negative cable first helps prevent accidental short circuits.
- Remove the positive cable: Next, disconnect the positive (marked with a “+” sign) cable.
- Secure the cables: Keep the wires separated once removed to avoid accidental reconnection or contact with metal objects.
- Place the battery aside: Set the battery in a safe, well-ventilated area away from your work zone.
Following this order minimizes risks and ensures that you handle the battery correctly. Always refer to the battery’s manual for any specific instructions regarding disconnection. D disconnecting the battery safely is necessary before you clean leads from leaking batteries. If you feel uncertain at any step, stop and double-check the instructions or consult a professional.
Part 8. How do you clean leads from leaking batteries?
Now comes the central part of the guide: learning the proper steps to clean leads from leaking batteries. Follow these detailed, step-by-step instructions to ensure a safe and effective cleaning process:
- Neutralize the acid:
- Mix one tablespoon baking soda with one cup of water to prepare your cleaning solution.
- Stir the solution until the baking soda is fully dissolved.
- This mixture will help neutralize any acid on the battery leads.
- Apply the solution:
- Dip a soft brush into the solution.
- Gently scrub the battery leads, focusing on areas with visible corrosion or residue.
- Work slowly to avoid splashing the solution.
- Wipe away residue:
- Use absorbent cloths to wipe the leads.
- Remove all traces of the neutralizing solution and any loosened debris.
- Keep wiping until the metal looks clean and free of deposits.
- Inspect your work:
- Look carefully at the battery leads.
- If any stubborn residue remains, repeat the scrubbing and wiping process.
- Ensuring complete cleaning is essential for the battery’s safety and performance.
- Dry the leads thoroughly:
- Use a dry, clean cloth to remove any moisture.
- Drying the leads prevents further corrosion and prepares them for reconnection.
- It is essential to leave no damp spots behind.
- Apply a protective spray (optional):
- After the leads are completely dry, consider spraying a light coat of protective terminal spray.
- This helps to prevent future corrosion and keeps the connections strong.
Taking your time with each step is vital. Never rush the process when cleaning leads from a leaking battery. Each action, from neutralizing the acid to drying the leads, contributes to a safer and more effective repair. Remember that the battery remains dangerous until all chemicals are neutralized and cleaned.
Part 9. What to do after cleaning?
After you have successfully cleaned the battery leads, follow these essential steps to ensure lasting safety and proper battery function:
- Allow everything to dry:
- Ensure the battery and its leads are completely dry before reconnecting anything.
- Moisture left behind can lead to further corrosion or even electrical problems.
- Apply a protective treatment:
- If you have a protective spray or terminal protector, apply it carefully to the cleaned leads.
- This extra step helps prevent future buildup of corrosion and chemical residue.
- Inspect the battery casing:
- Even if the leads are clean, examine the entire battery for any signs of damage, such as cracks or bulges.
- A damaged battery may need to be replaced to avoid further risks.
- Reconnect the battery correctly:
- Once you are sure everything is dry and in good condition, reconnect the battery cables properly—negative first, then positive.
- Double-check that the connections are secure.
- Dispose of cleaning materials properly:
- The cloths, brushes, and other disposable materials used during cleaning may be contaminated with battery chemicals.
- Dispose of these items following local hazardous waste guidelines.
- Monitor battery performance:
- After cleaning and reassembly, watch how the battery and connected devices perform.
- You may need to consult a professional or consider battery replacement if you notice any irregularities, such as recurring corrosion or reduced power.
Following these post-cleaning steps, you help ensure that your efforts to clean leads from leaking batteries are long-lasting. Regular monitoring and maintenance are key to avoiding future issues. Taking a few extra minutes after cleaning can save you from costly repairs and dangerous situations.
Part 10. FAQs about clean leads from leaking battery
What causes a battery to leak?
Battery leaks are typically caused by aging, physical damage, or improper charging. Over time, the casing can weaken, or an impact may crack it, leading to chemical leakage. Regular inspections can help catch these issues early, preventing further damage.
How often should I clean leads from leaking batteries?
You should clean the leads when you notice any signs of leakage or corrosion. Regular maintenance checks—ideally every few months—can help you detect early signs of battery issues. Timely cleaning prevents the buildup of dangerous residues and extends the battery’s life.
Can I clean battery leads without safety gear?
You should never attempt to clean leads from a leaking battery without proper safety gear. Gloves, goggles, and a face mask protect your skin, eyes, and respiratory system from harmful chemicals. Your safety should always come first.
Is it safe to use water to clean a leaking battery?
Water can be used in cleaning if mixed with a neutralizing agent like baking soda. However, plain water on a leaking battery is not recommended because it may spread harmful chemicals. Always follow the correct procedure and use the proper solution to ensure safe cleaning.
What should I do if the cleaning does not remove all corrosion?
Repeat the process with a fresh cleaning solution and a soft brush if some corrosion remains after cleaning. Persistent corrosion might indicate more profound battery damage. In that case, consider seeking advice from a professional technician to prevent further risks.
Related Tags:

More Articles

How to Choose the Best Floor Scrubber Battery for Commercial Cleaning?
Selecting the ideal floor scrubber battery ensures a long runtime, rapid charging, and minimal maintenance for efficient commercial cleaning operations.
Battery for Blower vs Battery for Leaf Vacuum: Which One Should You Choose?
Battery for blower vs leaf vacuum—learn the key differences in power, fit, and runtime to choose the right battery for your outdoor tool needs.
How to Choose the Right Battery for Blower?
Choosing the right blower battery? Consider voltage, capacity, chemistry & usage. This guide helps match the best battery for peak performance.
How to Choose the Best Insulated Battery Box for Lithium Batteries?
Choosing the Best Insulated Battery Box for Lithium Batteries? Discover key factors such as size, material, and safety for optimal protection and performance.
7 Critical Elements on a Lithium Battery Shipping Label
What must be on a lithium battery shipping label? Learn 7 key elements to ensure safety, legal compliance, and correct handling across all transport modes.
Custom Lithium-ion Battery Manufacturer